How to Remove Tiles Like a Pro: Step-by-Step Guide, Essential Tools and Tips
Jump to:
Whether you’re updating a small bathroom or undertaking a full kitchen renovation, removing tiles can feel overwhelming for many homeowners. The process can be challenging due to the strong adhesive securing the tiles and the potential risk of damaging the underlying surfaces.
This article will delve into why tile removal is often tricky and provide a complete guide to help you navigate the task. You’ll learn about the essential tools required and step-by-step instructions for removing wall and floor tiles efficiently. We’ll also discuss how to address any floor damage post-removal and techniques for removing grout.
By the end of this guide, you’ll have the knowledge and confidence to handle your tile removal project like a seasoned pro.
Why Are Tiles Difficult To Remove

Tile removal is a demanding process due to the strong adhesives that securely bond tiles to surfaces, ensuring durability over time. These adhesives, while effective for stability, become a significant challenge when it is time to remove the tiles, and considerable effort and time are required to break the bond.
A major difficulty lies in preventing damage to the underlying surfaces, such as drywall or subfloors. Wall tiles can cause cracks or holes in drywall if removed improperly, while floor tiles may gouge or splinter subfloors when excessive force or incorrect tools are used. Such damage can lead to costly and time-consuming repairs, making careful handling essential.
Beginners often face pitfalls like neglecting to score grout lines or using unsuitable tools, which can worsen damage and hinder progress. Rushing the process or skipping safety precautions, such as wearing protective gear, adds further risks. Dust and debris can also pose health concerns if not managed properly.
Successful tile removal demands patience, precision, and proper preparation. Using the correct tools and techniques, working methodically, and protecting both surfaces and yourself are crucial for minimizing damage and removing the tiles safely and efficiently.
Tools Needed To Remove Tiles

Although, as noted above, tile removal can be a demanding process, having the right tools helps you to be more efficient, ensures safety, and minimizes damage.
Safety Gear: Gloves
Before starting work, it is essential for you to have protective equipment. Gloves protect hands from sharp tile edges, goggles shield eyes from flying debris, and dust masks prevent the inhalation of harmful particles. For larger projects, ear protection is advised to guard against prolonged noise.

Atom Extra Durable Non-Slip Work Gloves 157
$5.75
Tools for Removing Grout: Grout Saw, Oscillating Multi-Tool
The first step in removal involves addressing the grout, which holds tiles together. A grout saw works well for small, precise jobs, while an oscillating multi-tool with a grout-removal blade is more efficient for larger areas. Proper grout removal loosens tiles without causing unnecessary damage.
Simple Tools for Prying Off the Tiles
Hammer
After removing the grout, individual tiles can be pried off using a hammer and chisel. Some examples of good hammers for this task include either this sharp-edged wooden-handled hammer or this plastic-headed double-sided mallet hammer.
The wooden-handled hammer is an excellent all-purpose tool for both driving nails and demolition work. Its ergonomic wooden handle fits securely into the head, offering a comfortable grip, while the head, crafted from high-quality Japanese steel, provides exceptional balance.
The hammer features a large, flat striking face ideal for driving nails and a sharp, pointed claw at the rear, and is perfect for a wide range of tasks. The plastic head hammer is ideal for bending metal or striking wood and plastic without risking dents or scratches on the material's surface. Its gentle striking face is especially suited for working with softer or thinner materials, as it minimizes damage compared to a harder hammer head.

Dogyo Nylon 1lb Mallet Wood Handle Plastic Head Hammer
$27.95

Dogyu Cutting Tip Hammer Sharp Edge Wooden Handled Hammer 21mm
$26.99
These are both made by Dogyu, a Japanese toolmaker from Miki, in Hyogo Prefecture. Dogyu has been operating for over 120 years, and produces everything in-house, from dies and jigs to components for their forging machines, thus ensuring the creation of top-quality tools with distinctive and innovative designs.
Chisel
This chisel made by the same company is also essential for removing tiles. Crafted from a single, ultra-hard piece of steel and encased in a comfortable grip, this chisel offers exceptional durability and user-friendliness.
Dogyu Duct Cutter & Spot Welding Chisel 245mm
$24.99
Screwdriver
Lastly, a screwdriver can prove useful for prying up edge or corner tiles, particularly when there's a gap to insert the blade. It can be beneficial at the beginning of the removal process, where accessing the first tile might be challenging with larger tools.
If you need a screwdriver for this task, look no further than this chisel screwdriver from Vessel. It doubles as a chisel, thanks to its specially hardened (58 HRC) tips that endure substantial impact, and its elastomer-resin grips that effectively absorb a remarkable amount of shock.
Vessel Megadora Full-Tang Chisel Screwdriver 9.5mm 970
$23.99
Specialized Tools: Electric Tile Lifter, Floor Scraper
For extensive projects, investing in specialized tools like an electric tile lifter or floor scraper can significantly save time and effort. An electric tile lifter quickly removes tiles, while a floor scraper clears adhesive residue, leaving a clean surface for new flooring.
With the right preparation and tools, tile removal becomes more manageable, reducing risks to both surfaces and the installer while streamlining the renovation process.
How to Remove Tiles: Step By Step

Are you feeling a bit overwhelmed when faced with the task of removing tiles? Not to worry! The following will provide a step by guide to getting the job done.
Preparing the Area
Tile removal involves careful preparation and methodical work to ensure efficiency and minimize damage.
- Start by removing any furniture or items that could obstruct your workspace or be damaged.
- Protect nearby surfaces with drop cloths or plastic sheeting to shield them from dust and debris.
- If working near plumbing or electrical wiring, turn off utilities to prevent accidents.
- Assess the condition of the tiles and the underlying surface to identify issues such as cracks or weak grout, which will help you plan the removal process effectively.
Removing Wall Tiles
- Begin by removing the grout around the edges. Use a grout removal tool or an oscillating multi-tool with a grout blade for precision. Carefully scrape away the grout without damaging the wall beneath.
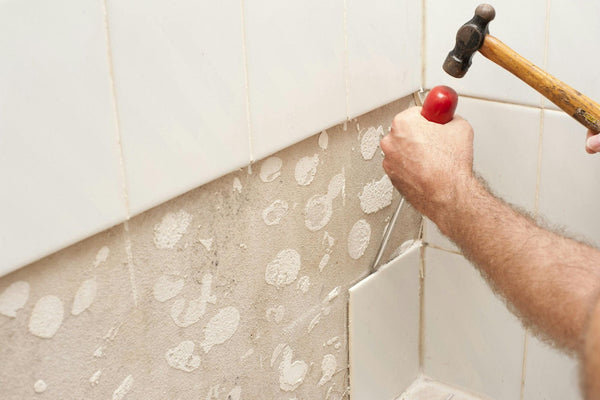
- Once the grout is cleared, use a chisel and hammer to pry off the tiles. Position the chisel at a shallow angle under a tile’s edge and tap gently to lift it. If a tile is particularly stubborn, applying heat with a heat gun can soften the adhesive. Work methodically, taking care to avoid cracking tiles or damaging the wall.
Removing Floor Tiles
- Start with broken tiles or those at the edges, as these provide easier access points.
- Use a floor scraper for manual removal or an electric tile lifter for larger areas to save time and effort. These tools efficiently lift tiles and adhesive, reducing physical strain.
- Regularly sweep or vacuum the workspace to manage dust and debris, ensuring safety and organization. Be cautious of uneven surfaces and sharp fragments that can cause injury.
By carefully preparing the area and using the appropriate tools and techniques, you can handle both wall and floor tile removal confidently. This approach minimizes damage to underlying surfaces and creates a clean slate for your renovation project, ensuring a smooth transition to the next phase.
Treating The Floor For Damage After Removal

Despite your best efforts, the tile removal process may cause damage to the floor. Treating the floor for damage after removing tiles is essential to create a smooth, even base for new tiling.
Start by cleaning the surface thoroughly, removing adhesive, grout, and debris with a scraper or adhesive remover, followed by vacuuming or mopping to eliminate dust. A clean surface allows for accurate inspection and easier repairs.
Next, inspect the floor for cracks, holes, or uneven areas. For minor cracks and holes in concrete, apply a patching compound using a trowel, smoothing it out evenly. For wood subfloors, use wood filler for small issues or replace damaged sections for more significant problems. Ensure repairs are level with the surrounding floor.
Address uneven surfaces by applying a self-leveling compound, especially if the floor has low spots or dips. This compound spreads evenly, creating a flat surface ideal for new flooring. Follow manufacturer instructions for proper application and drying times.
If water damage is present, remove and replace affected subfloor sections. Treat adjacent areas with a mold-resistant solution to prevent further issues, especially in moisture-prone spaces like kitchens or bathrooms.
Finally, sand the repaired areas to ensure a seamless transition between old and repaired surfaces. This step helps prepare the floor for the next layer, ensuring a durable and professional-looking finish. Completing these steps ensures a stable and smooth foundation for your new flooring.
Removing Tiles: A Tricky But Not Impossible Task
In conclusion, successfully removing tiles, whether from walls or floors, requires thorough preparation, the right tools, and a methodical approach. This guide aims to provide you with the essential knowledge to tackle the challenges of tile removal with confidence.
We’ve covered key steps, including proper preparation, the importance of safety gear, and strategies for dealing with strong adhesives and protecting underlying surfaces. Additionally, we’ve explored the necessary tools, step-by-step instructions for the process, and tips for addressing floor damage after removal.
Have you ever tried removing tiles yourself? What did you find to be the most challenging part of the process? Share your experience in the comments below!

0 comments